- Installation Hack
- Terminal and Linux Shell Navigation
- Windows Subsystem for Linux (WSL) Setup
- MacOS Setup
- Install Developer Tools
- Version Checks
- Open a Project
- Development Cycle
Installation Hack
It is fundamental that you learn how to create your own blogging website and understand the following concepts:
Shell Commands
- Take note and describe the type of shell commands you are using through Terminal in this installation procedure. This is specific to your machine.
- Examples:
wsl,cd,git,apt,brew, etc.
- Examples:
Version Control
- In the development process, developers use version control. Annotate in your notes what you have learned about version control during this setup process.
- How are the files from GitHub placed on your local machine? How do you navigate to those files?
- How are the files updated in GitHub? How do you navigate to those files?
- How would you update your template of the
student_2025repository? How would you make it more applicable to your specific course?
Localhost vs. Deployed Server
- Put into words the difference between viewing GitHub Pages running on your localhost machine versus running on a deployed server.
- What is the localhost URL for your project? Can anyone else see what you see?
- What is the GitHub Pages URL for your project? Can anyone else see what you see?
DNS and GitHub Pages
- DNS is the address manager for the internet. Reflect on the following questions:
- Is there a domain on your GitHub Pages?
- Is the URL for your GitHub Pages different from your neighbors’ URLs? Did you change the URL? If so, when?
By completing these “Hacks,” you will gain a deeper understanding of the tools and processes involved in setting up and managing a development environment, version control, and deploying a website.
Terminal and Linux Shell Navigation
You are expected to identify your computer type, know its operating system, and manage folders and files effectively.
Each computer type—Windows/WSL, MacOS, and Chromebook using KASM student workspace—provides an option for a Terminal.
As you proceed, you will be running Linux shell commands in your Terminal.
- Explore or research Linux shell commands such as
cd,pwd,mkdir, etc. - Click for Linux navigation commands.
- Use Google or chat tools for questions like “What is Linux cd?”
- Learn how to open a Terminal in your workspace.
Be mindful that different workspaces will have distinct setup and installation requirements. However, after the initial setup, we will aim to make our workspaces as similar as possible.
Windows Subsystem for Linux (WSL) Setup
WSL provides a Linux terminal environment on a Windows computer. Linux is an open-source operating system with many distributions, such as Ubuntu Linux, which we will install and use. Once we install Ubuntu Linux, we will be able to run Linux/Unix commands. Ubuntu includes a package manager called apt that allows us to add developer packages and libraries to the machine.
To get started, download WSL and Ubuntu 22.04:
-
Open PowerShell as an administrator (Right-click -> Run as administrator) and type:
wsl --install -d Ubuntu-22.04 -
After the installation finishes, restart your computer.
-
After restarting, a command prompt or PowerShell prompt may automatically open, asking for a username. Enter a username and password to create your account. Note, that the password will not be visible as you type, but it is still being registered.
If no prompt opens, open PowerShell as an administrator and run:
wsl --install -d Ubuntu-22.04 -
Open Command Prompt or PowerShell as a regular user (just click on Command Prompt or PowerShell), and type
wsl. The terminal’s prompt should change fromPS C:\Users\<username>to<username>@MSI:. You are now ready to use Linux/Unix commands. -
To set Ubuntu 22.04 as the default WSL distribution, run:
wsl --set-default Ubuntu-22.04
WSL (Reference, shows WSL commands)
As a WSL user, refer to these PowerShell commands for troubleshooting or configuration changes. These are used to correct or set up WSL, thus all WSL commands work at the PowerShell prompt PS C:\Users\<username>.
- List all WSL commands:
wsl -horwsl -help - List installable WSL distros:
wsl -l -o - List installed WSL distros:
wsl -lorwsl --list - List installed WSL distros with status and version:
wsl -l -vorwsl -l --verbose - Run the default WSL distro:
wsl - Run an alternate distro:
wsl -d <distro_name>orwsl --distribution <distro_name> - Shutdown a specific distro:
wsl -t <distro_name>orwsl --terminate <distro_name> - Shutdown all distros:
wsl --shutdown - Set a specific distro as default:
wsl -s <distro_name>orwsl --set-default <distro_name>
WSL VSCode Install
VS Code provides a place to create and edit code. Follow the steps below to download VS Code onto your computer.
-
Install VS Code
-
When the installer asks to Select Additional Tasks, check “Add to PATH”.
-
Open VS Code. In the sidebar, click on “Extensions”. Search for “Remote Development extension pack” and install it.
MacOS Setup
VS Code provides a place to create and edit code. Homebrew is a package manager that simplifies the installation of developer tools.
MacOS VSCode and Homebrew Install
MacOS terminal supports Linux/Unix commands by default. To enhance its capabilities, we need to install Homebrew.
- Install VS Code:
- Download and install VS Code.
- Install Homebrew:
- Open the Terminal and run the following command to install Homebrew:
/bin/bash -c "$(curl -fsSL https://raw.githubusercontent.com/Homebrew/install/HEAD/install.sh)" - Follow the on-screen instructions to complete the installation.
- Open the Terminal and run the following command to install Homebrew:
- Verify Homebrew Installation:
- Run
brew --versionin the Terminal to ensure Homebrew is installed correctly.
- Run
Install Developer Tools
At this point, your machine, operating system, and workspace are prepared for additional developer tool installations. (For KASM workspace users, this is where you enter the process, as images have been set up for development.)
Before continuing, it is crucial to understand the purpose of a package manager. A package manager is used to install key developer tools and packages. Examples of tools include Python, Java, and various frameworks for web development, databases, and data science.
Here are some references that may assist you if you encounter any issues while following the procedures.
Ubuntu, for WSL and KASM workspace users (apt-get or apt)
- Update package list:
sudo apt update - Upgrade installed packages:
sudo apt upgrade - Install a package:
sudo apt install <package_name> - Remove a package:
sudo apt remove <package_name> - Search for a package:
apt search <package_name> - List installed packages:
apt list --installed
MacOS users
- List installed packages:
brew list - Search for a package:
brew search <package_name> - Update Homebrew:
brew update - Upgrade installed packages:
brew upgrade - Uninstall a package:
brew uninstall <package_name>
With the package manager references in hand, you are now ready to proceed with the detailed instructions for installing the necessary developer tools. Follow the steps specific to your operating system to ensure a smooth setup process.
If using KASM Workspace Ubuntu terminal
Perform steps in either option A or option B below to install Gems
# Option A -- Most tools have been pre-installed. Run shell command to automatically finish tool setup.
~/vscode/portfolio_2005/scripts/activate.sh

# Option B -- Run Ubuntu commands manually to manually finish tool setup.
# Install Gems
export GEM_HOME="$HOME/gems"
export PATH="$HOME/gems/bin:$PATH"
echo 'export GEM_HOME="$HOME/gems"' >> ~/.bashrc
echo 'export PATH="$HOME/gems/bin:$PATH"' >> ~/.bashrc
gem install jekyll bundler

---

<br>


### If using Windows Subsystem for Linux terminal

Perform steps in either option A or option B below to install required Ruby, Python, and Jupyter

```bash
# Option A -- Run shell command to automatically install all your tools.
~/vscode/portfolio_2005/scripts/activate_ubuntu.sh

# Option B -- Run each WSL/Ubuntu command to manually install each tool, one by one.
# This section is for setting up Ruby, Python, and Jupyter Notebook on WSL (Ubuntu).

# Upgrade and install packages for Ubuntu
echo "=== Upgrade Packages ==="
sudo apt update
sudo apt upgrade -y

# Install Ruby and necessary development tools
echo "=== Install Ruby ==="
sudo apt install -y ruby-full build-essential zlib1g-dev

# Install Python 3 and pip
echo "=== Install Python ==="
sudo apt-get install -y python3 python3-pip python-is-python3

# Install Jupyter Notebook
echo "=== Install Jupyter Notebook ==="
sudo apt-get install -y jupyter-notebook

# Install Gems
export GEM_HOME="$HOME/gems"
export PATH="$HOME/gems/bin:$PATH"
echo 'export GEM_HOME="$HOME/gems"' >> ~/.bashrc
echo 'export PATH="$HOME/gems/bin:$PATH"' >> ~/.bashrc
gem install jekyll bundler
If using MacOS terminal
Perform steps in either option A or option B below to install required Ruby, Python, and Jupyter.
# Option A -- Run shell command to automatically install all your tools.
~/vscode/portfolio_2005/scripts/activate_macos.sh
# Option B -- Run each MacOS command to manually install each tool, one by one.
# This section is for setting up Ruby, Python, and Jupyter Notebook on macOS.

# Upgrade Homebrew and install xz (decompression utility)
echo "=== Upgrade Packages ==="
brew update
brew upgrade
brew install xz # decompression utility

# Install rbenv, Ruby 3.1.4, and configure it
echo "=== Install Ruby ==="
brew install rbenv
rbenv install 3.1.4
rbenv global 3.1.4

# Configure rbenv to initialize in the shell
echo 'if which rbenv > /dev/null; then eval "$(rbenv init - zsh)"; fi' >> ~/.zshrc

# Start a new terminal, test if Ruby 3.1.4 is set
rbenv versions

# Install Python and Pip using Homebrew
echo "=== Install Python ==="
brew install python

# Install Jupyter Notebook using Homebrew
echo "=== Install Jupyter Notebook ==="
brew install jupyter

# Install Gems
export GEM_HOME="$HOME/gems"
export PATH="$HOME/gems/bin:$PATH"
echo 'export GEM_HOME="$HOME/gems"' >> ~/.zshrc
echo 'export PATH="$HOME/gems/bin:$PATH"' >> ~/.zshrc
gem install jekyll bundler
If using MacOS terminal, continue with these steps
These steps are required for both Option A and Option B
##### All Apple, resolves failure on make step
ln -s /opt/homebrew/share/jupyter/nbconvert ~/Library/Jupyter

##### Only Apple Silicon M series, resolves Failure on python and pip
ln -s /opt/homebrew/bin/python3 /opt/homebrew/bin/python
ln -s /opt/homebrew/bin/pip3 /opt/homebrew/bin/pip

###### Only Apple Intel series, resolves failure on python and pip
sudo ln -s /usr/local/bin/python3 /usr/local/bin/python
sudo ln -s /usr/local/bin/pip3 /usr/local/bin/pip
Version Checks
From here the steps for all should behave the same.
- Close existing terminal!!!
- Then start a new terminal. Start and stop are required to make sure changes to you machine have taken effect.
- Run each check below, if the check does not work, you will need to backup to resolve it now!!!
# Show the active Ruby version, MacOS is 3.1.4
ruby -v

# Show active Python version, it needs to be 3.9 or better
python --version

# Setup Python libraries for Notebook conversion
pip install nbconvert  # library for notebook conversion
pip install nbformat  # notebook file utility
pip install pyyaml  # notebook frontmatter

# Show Jupyter packages, nbconvert needs to be in the list
jupyter --version
# Show Kernels, python3 needs to be in list
jupyter kernelspec list # does not work on Cloud Ubuntu
Open a Project
Learn to use Terminal, VSCode, and GitHub. Use VSCode’s connection to GitHub to pull and sync code.
Git Clone and VSCode Launch
Follow the steps in order. References to WSL are not applicable if you have MacOS or Cloud Ubuntu.
-
Open a Linux-supported Terminal
-
Setup personal GitHub variables: Change
youremail@gmail.comandyourGHIDto match your credentials. This is required prior to syncing code to GitHub.git config --global user.email youremail@gmail.com git config --global user.name yourGHID -
Move to your home directory:
cd -
Setup a directory for projects:
mkdir nighthawk cd nighthawk git clone https://github.com/nighthawkcoders/student_2025.git -
Open the repository in VS Code:
cd student_2025 code . -
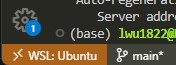
WSL only!!! Very important!!! Check that VSCode is opened in WSL, observe at the bottom left corner of the window. This is a requirement for grading.
Development Cycle
The development cycle involves iterative steps of making changes, running the server, testing, committing, and syncing changes to GitHub.
Bundle Install and Make Steps
All students are building a GitHub Pages website.
The following commands are the same for all machine types, terminals, and projects. The previous installation steps were to ensure all environments are compatible.
-
Open your terminal in VS Code through View -> Terminal. Alternatively, the shortcut
Ctrl + `can be used. (Opening up VS Code’s terminal opens your student repository in the project directory.) -
Type
bundle installThis command installs the dependencies in your Gemfile. -
Type
makeThis runs the local server. Repeat this command as often as you make changes. -
Hover then Cmd or Ctl Click on the Server address http://127.0.0.1 … provided in the terminal output from the make command.
### Congratulations!!! An output similar to below means tool and equipment success ###
johnmortensen@Johns-MBP portfolio_2025 % make
Stopping server...
Stopping logging process...
Starting server...
Server PID: 48190
Terminal logging starting, watching server...
Server started in 3 seconds
Configuration file: /Users/johnmortensen/vscode/portfolio_2025/_config.yml
To use retry middleware with Faraday v2.0+, install `faraday-retry` gem
            Source: /Users/johnmortensen/vscode/portfolio_2025
       Destination: /Users/johnmortensen/vscode/portfolio_2025/_site
 Incremental build: disabled. Enable with --incremental
      Generating...
      Remote Theme: Using theme jekyll/minima
                    done in 2.493 seconds.
 Auto-regeneration: enabled for '/Users/johnmortensen/vscode/portfolio_2025'
    Server address: http://127.0.0.1:4100/portfolio_2025/
Make commands (local build: make, make clean, make stop, make convert)
These commands are used to build and manage a localhost version of website. The purpose of this is to verify and test code changes prior to pushing changes to GitHub Pages.
-
makeRuns the local server. -
make cleanStops the local server and cleans the files. -
make stopStops the local server. This means you will be unable to access your blog on http://localhost until you runmakeagain. -
make convertConverts Jupyter Notebook files. Run this if your .ipynb files are not updating on the server, it may assist in finding the error.
VSCode Commit changes
The VSCode saved files are only stored on your computer locally until you commit/sync the changes. If you visit your actual blog on the web (https://
Commit Changes, version control locally
This creates a version update in your local git database. Developers often commit several times before they sync/push. This allows for many small changes that can be easily reviewed and rolled back. Review COMMITS in VSCode.
-
Click on the button that says “Source Control” in VS Code’s left sidebar
-
Click on the plus sign to stage your changes

-
Enter a message for your commit in the message box.
-
Click the “Commit button”
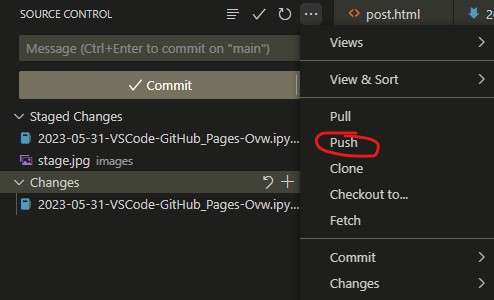
Sync Chaanges, update change in GitHub
This moves commit(s) from the local git database to GitHub. This will create an Action in GitHub Pages and trigger an update to the website if the code is error-free.
-
Click the Menu button and then click “Push”.